This is an HTML version of the readme that is found alongside the Python script that I mentioned in the forward that was intended to help students learn about simulating ions by looking at source code. To download a .zip file containing a PDF version of this readme as well as the “ion_simulation_script.py” and the “electrodes.png” files, click the button below:
Installing Python
The joy of toolchains
The Ion Simulator Script is written in a programming language called Python. Python is a free, general purpose programming language and is used to work with web servers, make games, automate tasks, control robots, and is used by many scientists, including mass spectrometrists, to analyze their data. Python does not come with many programming libraries by default. Programming libraries are collections of code imported into a programming project that add additional functionality to the program. For instance, the “NumPy” library (also referred to as the “numpy” or “np” library) is a Python library that works with numbers (Numerical Python) and adds matrix math and linear algebra algorithms to Python. A “distribution” of Python called Anaconda comes with a lot of libraries for scientists, including NumPy. I recommend installing the Anaconda distribution of Python from:
On the Anaconda download webpage, click “Download.” The browser should automatically scroll to the bottom of the page and present options for downloading Anaconda for Win-dows, MacOS, and Linux in both 64-bit and 32-bit versions. Unless you are working on a very old computer (>10 years old), you likely have a 64-bit operating system and should use the 64-bit option for the installer. Choose whichever operating system you are using (Windows, MacOS or Linux). Note: Continuum (the company that makes Anaconda) sells distributions of Anaconda to companies. As you are not a company, you are free to install Anaconda without paying. Everything needed for running the Ion Simulator Script is free.
Wait until the Anaconda installer has downloaded and click the installer to install it. Go through the install guide and use the default settings. Anaconda should begin installing. This might take a few minutes.
When Anaconda has finished installing, you should be able to open the “Anaconda Navigator”. Windows users can open the Anaconda Navigator by clicking on the “start” icon and typing “Anaconda” which should show the Navigator. Open the Anaconda Navigator which should look like:
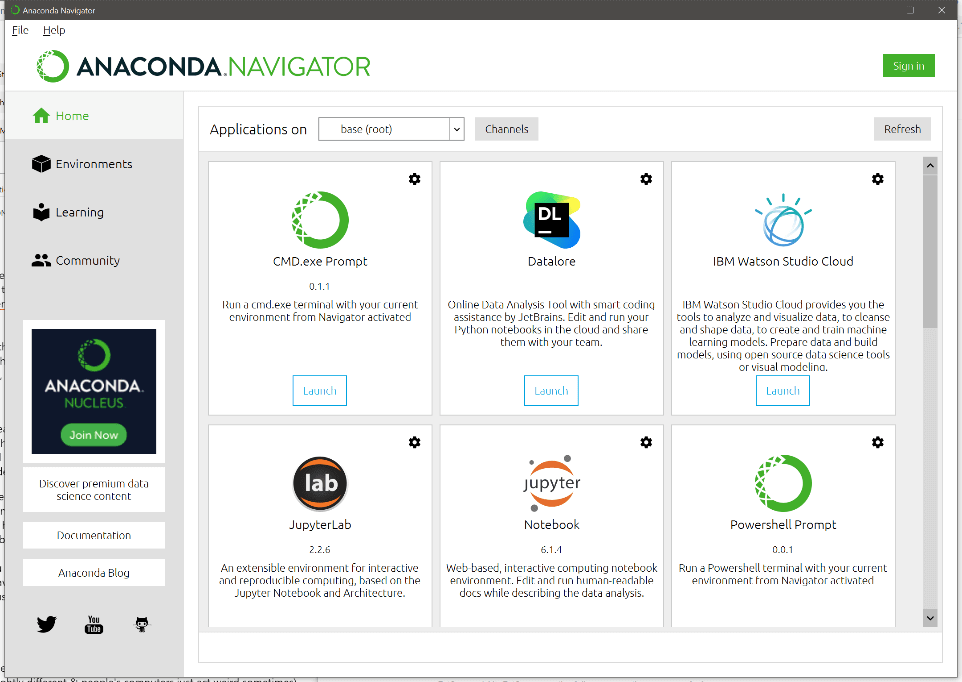
Although Anaconda comes with many libraries, including NumPy and Matplotlib (a library we will be using for generating plots), it does not come with the “OpenCV” library that provides some very useful image processing functions. In order to install the “OpenCV”, please launch either the “CMD.exe” prompt or the “Powershell” prompt from the Anaconda Navigator. If you are using Linux or MacOS, there might be a different set of launchers, one of which should be something like “Terminal” or “Command Line”. The window you should see should look something like (although the background color might be different):
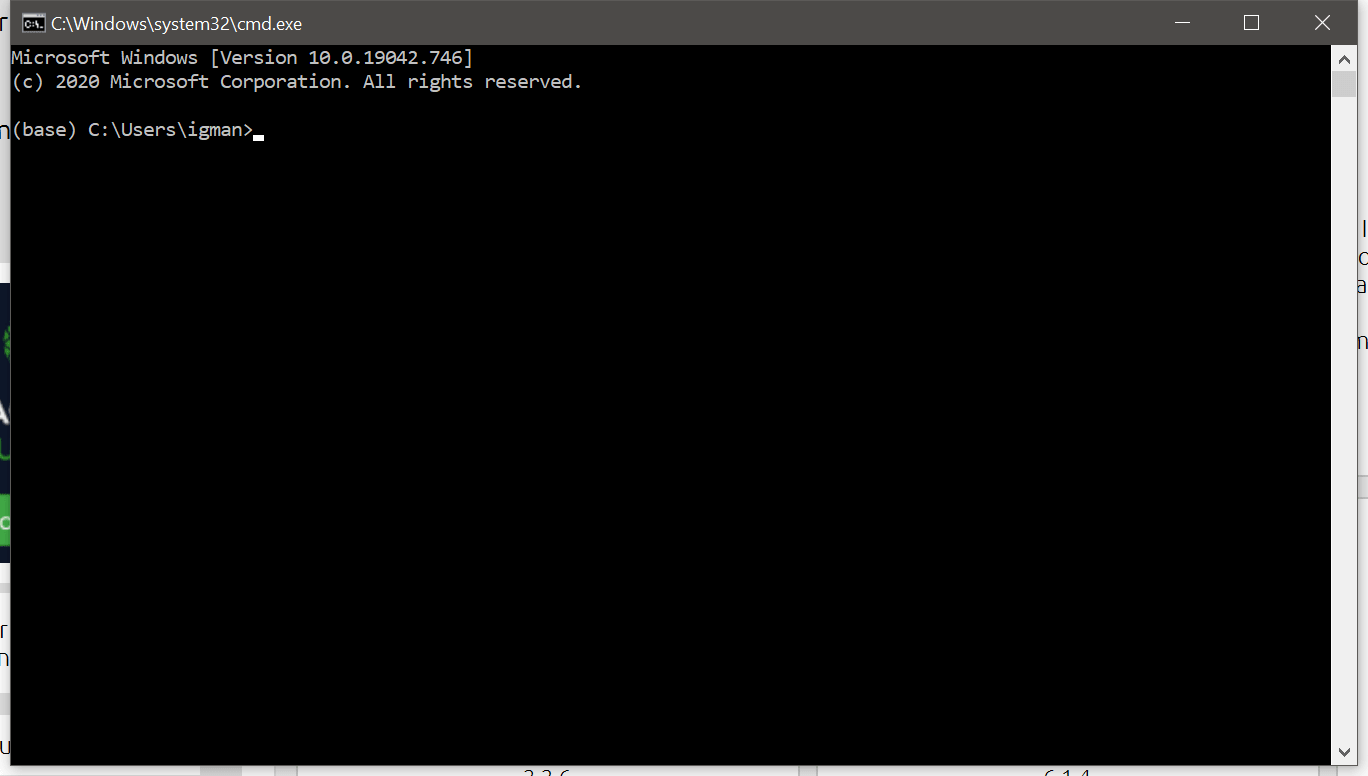
To test if things are working correctly, consider typing:
python --version
into the prompt. You should see a read back that is something like “Python 3.8.5” or Python followed by a slightly different number. This shows that Python is understood as a command. To install OpenCV, type:
pip install opencv-python
This should install the OpenCV library.
Spyder
MATLAB lite
Now that the OpenCV library is installed, close the terminal window and go to the Anaconda Navigator. One of the launchers should be for “Spyder”, which is an integrated development environment for Python. Launch Spyder.
You should see a window with a few sub-sections open. Close any popups that open until you see a screen that looks like:
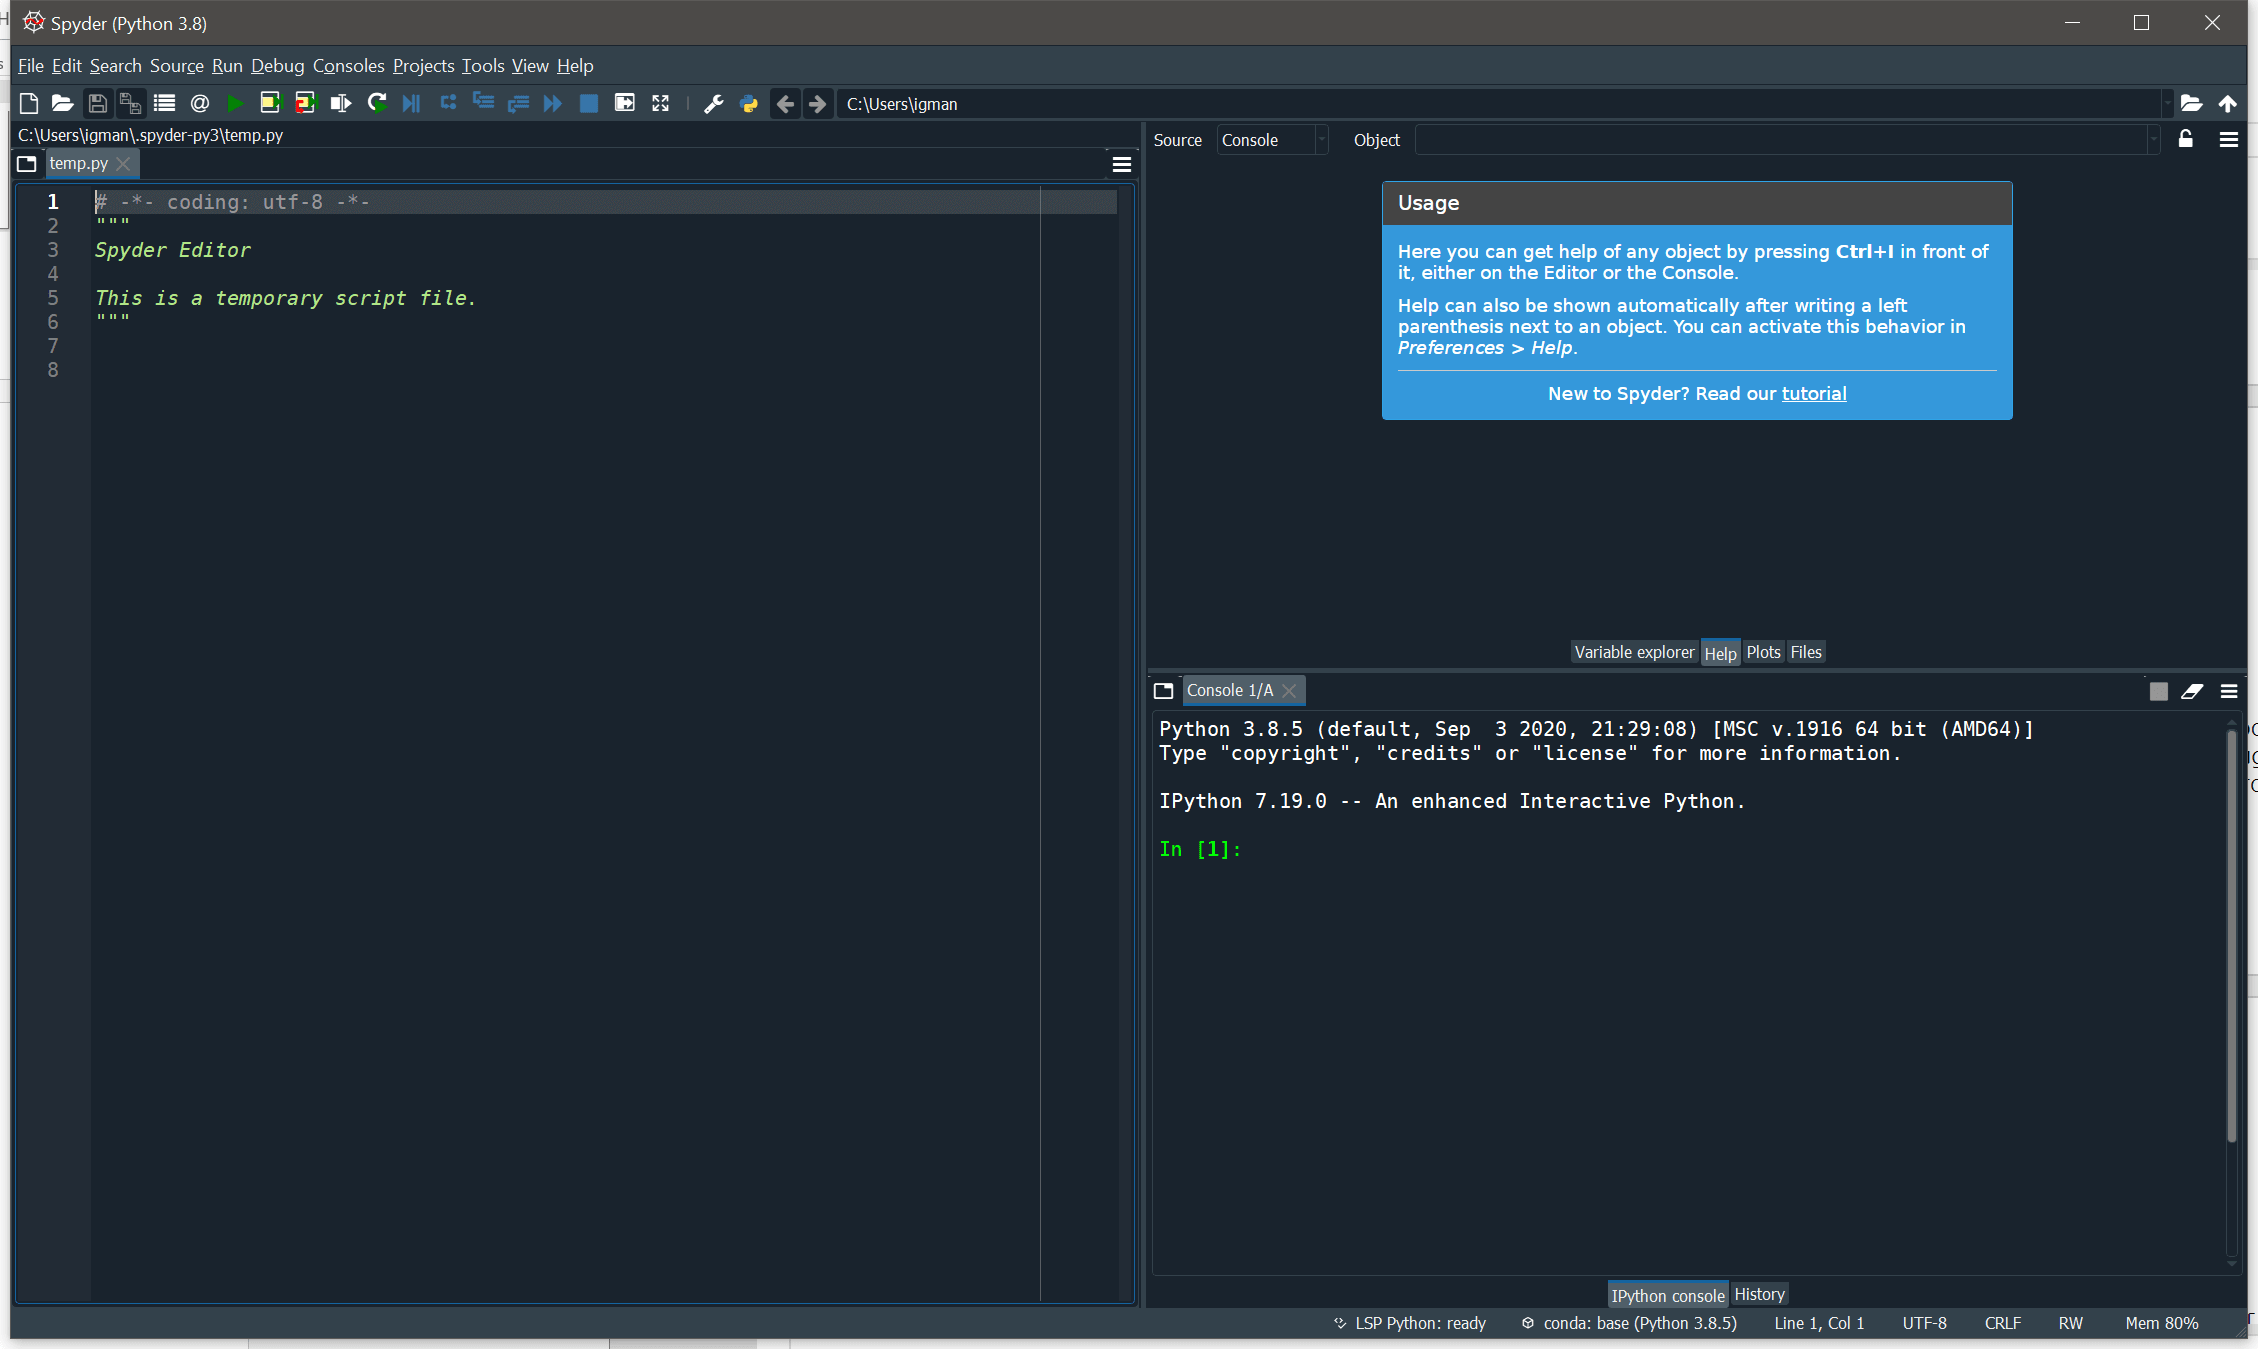
The colors might be “light” themed instead of “dark” themed as they are in this image.
The left side of Spyder lets you look at a Python file (like the “ion_simulator_script.py” file). Open that file in Spyder by clicking on “File” in the top-left corner, and then clicking on “Open” in the File submenu. Navigate to wherever you extracted the zip folder that this readme is in and select the “ion_simulator_script.py” file. The file should load and you should see a new tab on the left with lots of colored text.
Running the Ion Simulation Script
Simulating ions: the good parts
Now that Spyder should be properly configured, you should be able to run the Ion Simulation Script by either clicking the green “run” triangle in the top-left side of the menu bar, or by pressing “F5” on your keyboard. In either case, you should see an output in the “console” (bottom-right) pane of the Spyder program and your window state should look something like:
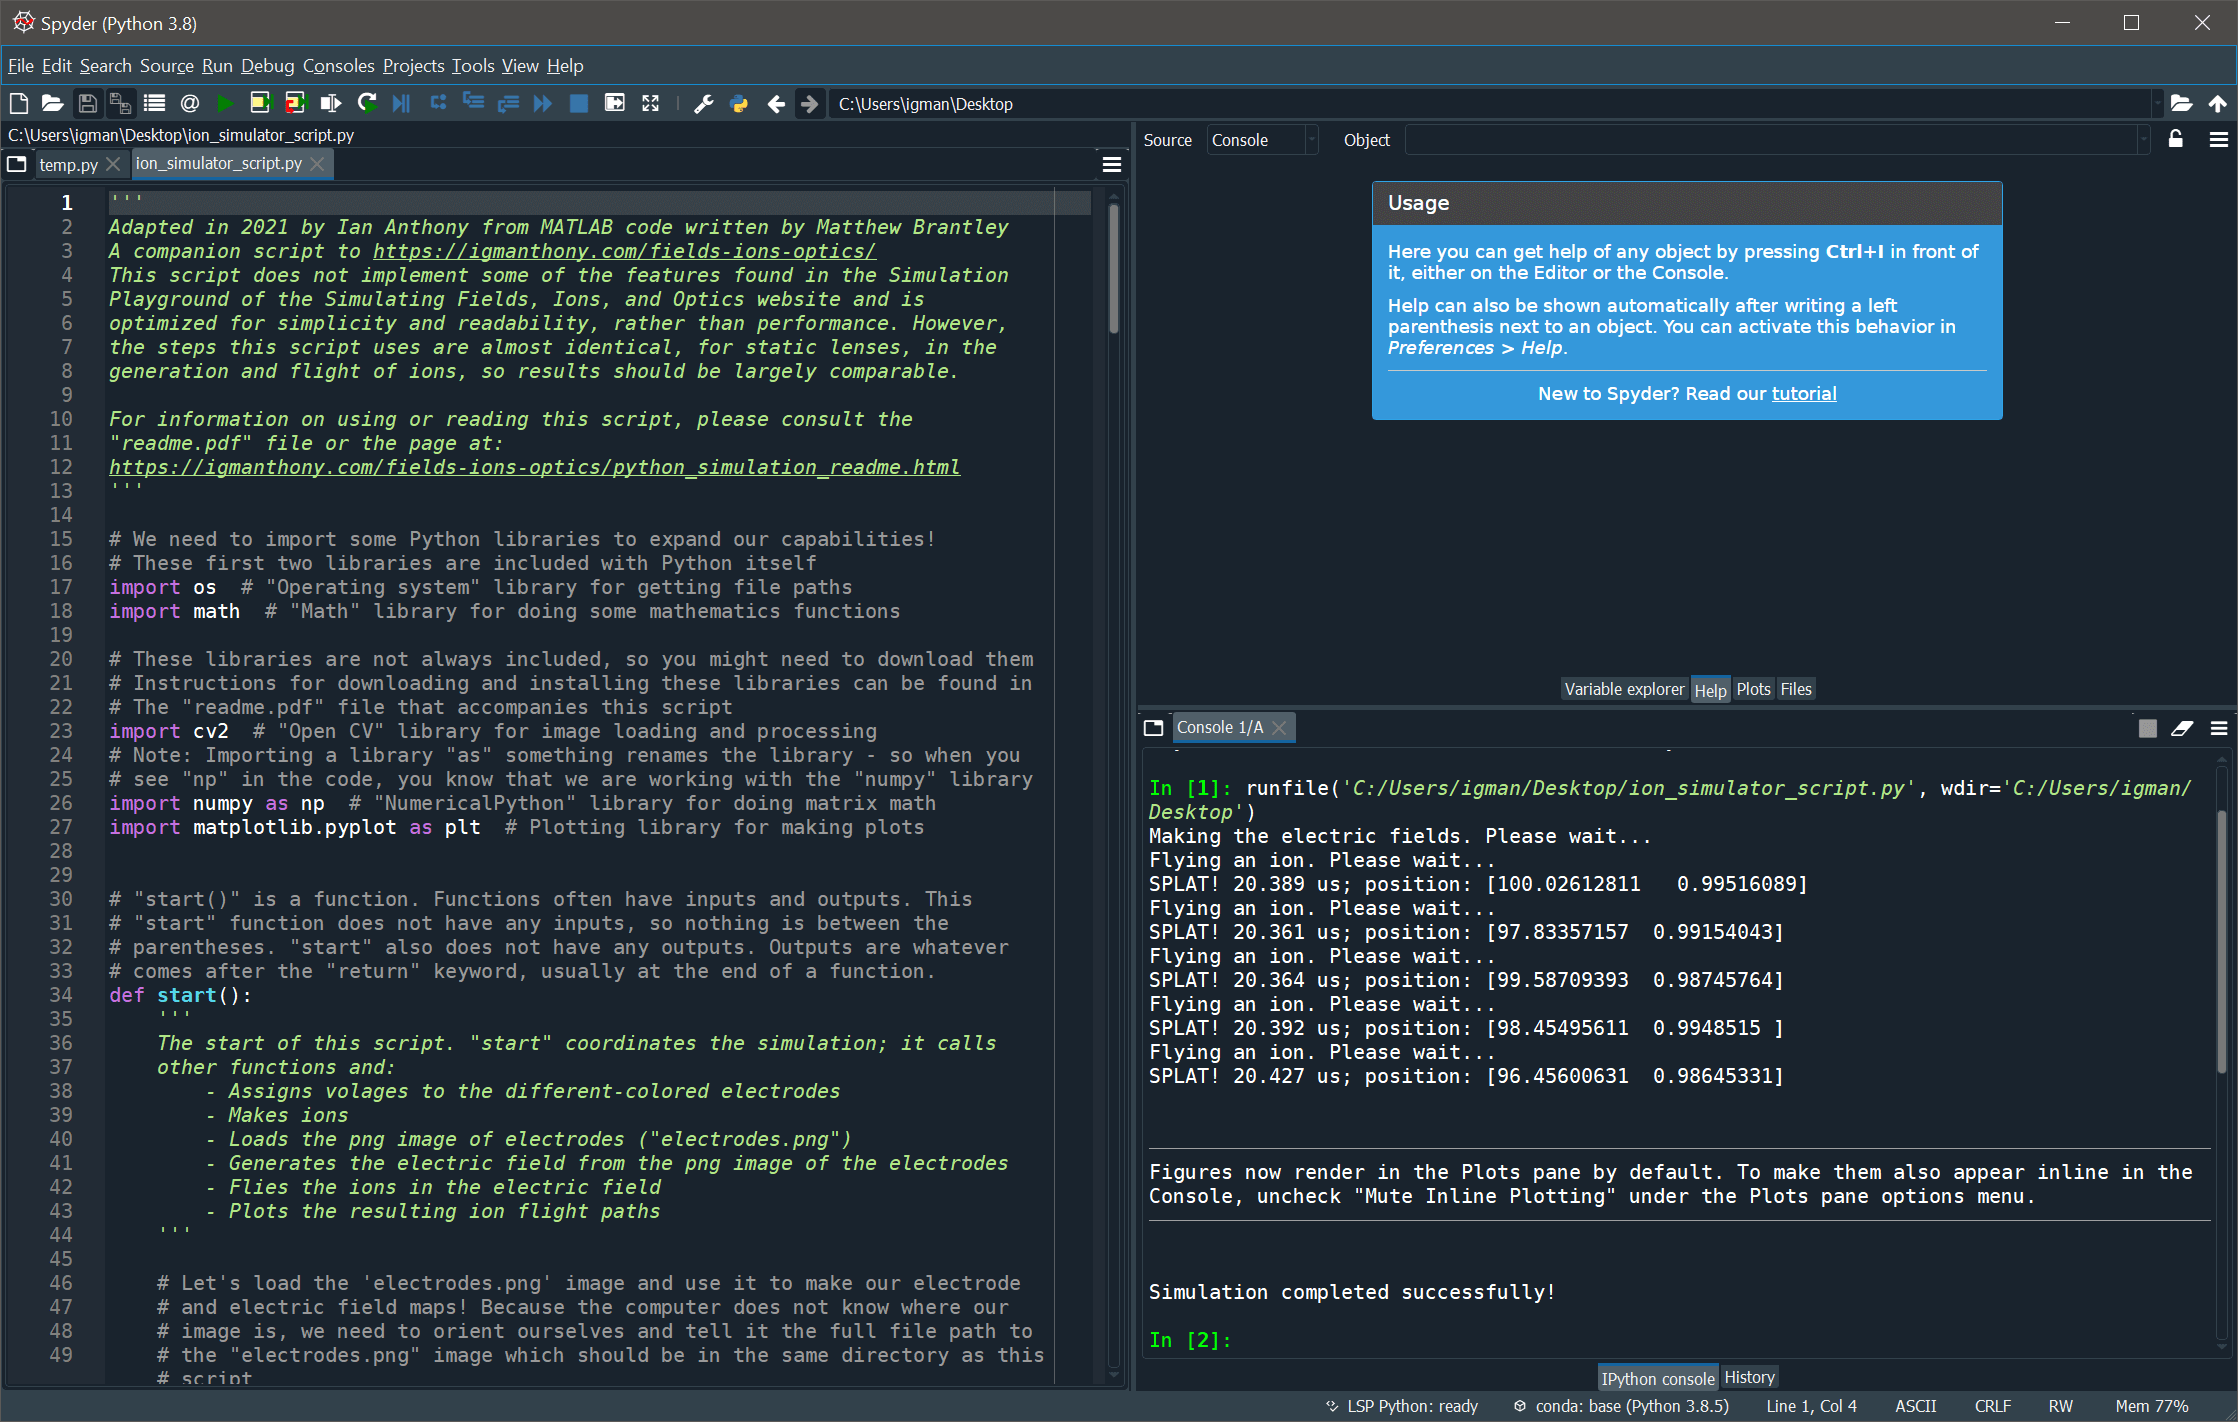
You may or may not see a plot appear. If you look at the output of the console in the bottom-right pane, you should see “Simulation completed successfully!”. If you do, then everything worked! However, Spyder uses “Interactive” Python, or IPython, consoles. Although they can be very nice, these consoles prevent popout plots. To enable popout plotting (to better see the results of our simulations), consider clicking on the “Console” part of the Spyder program (the bottom-right pane) and typing in the prompt:
%matplotlib auto
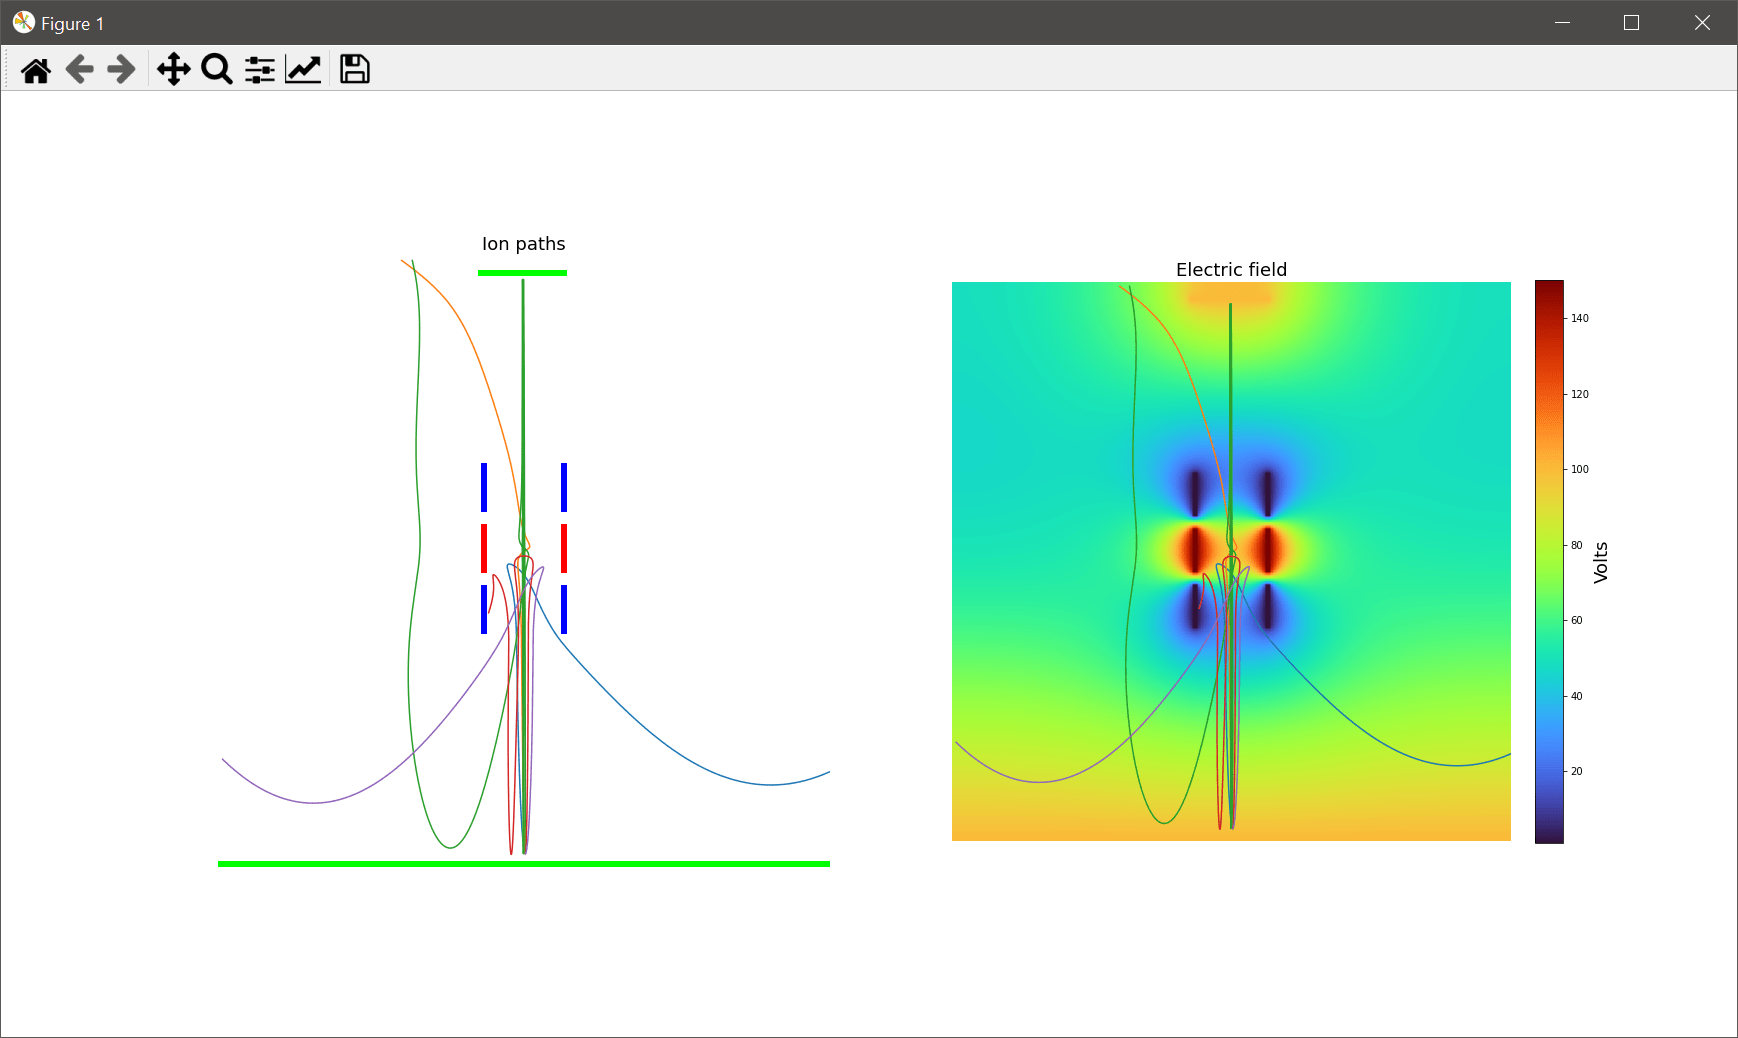
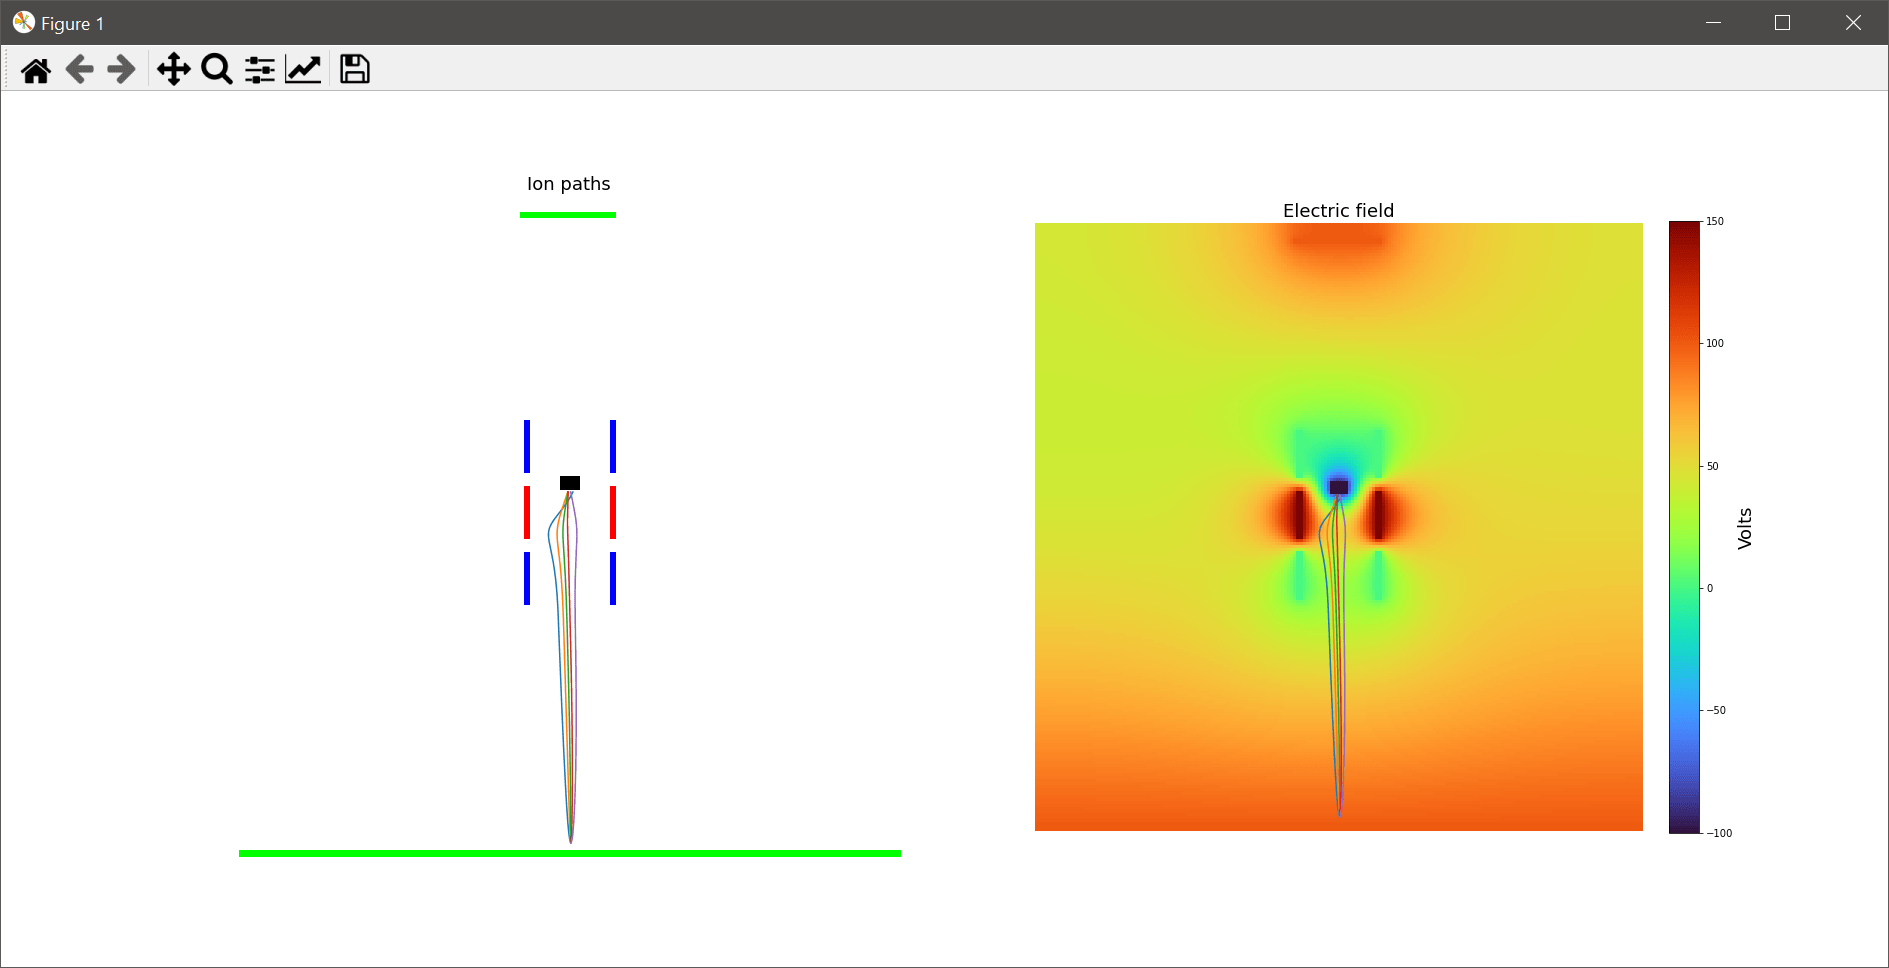
You should see some response such as “Using matplotlib backend: Qt5Agg”. If you re-run the script, there should be a popup window that appears. The popup window might be hidden behind other windows, so check the taskbar to see if there is a new icon that might be the popup window. In the popup window you should see two plots (you should be able to resize the popup window for better viewing):
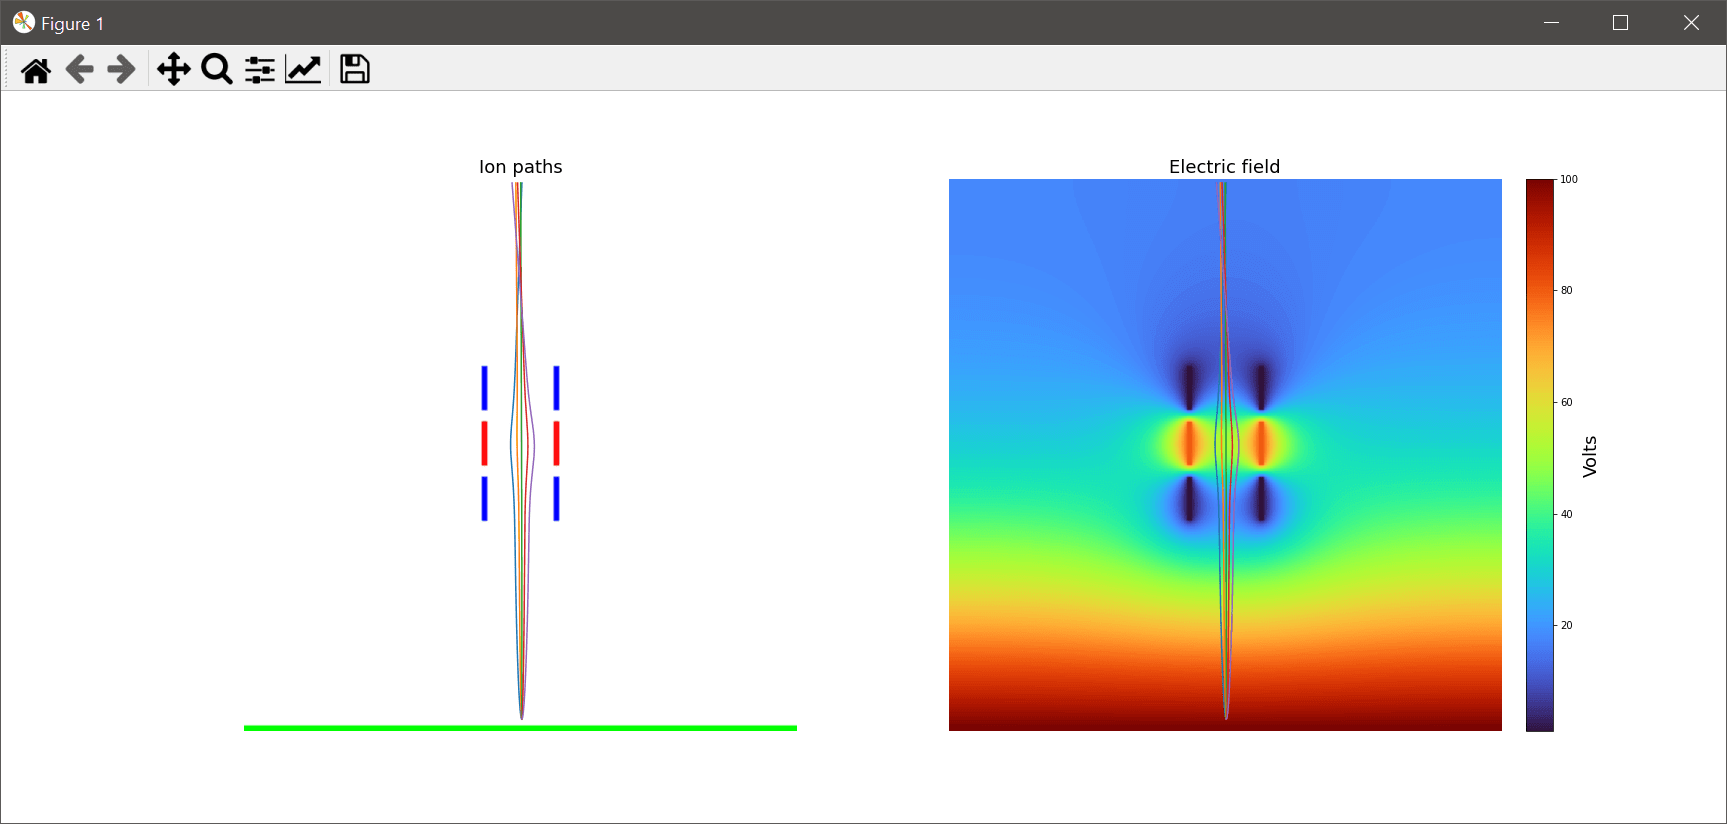
The left plot shows the image “electrodes.png” the right plot shows the electrical fields generated by the electrodes and the “ion_simulation_script.py”. The positive electric fields on the right are red or reddish in color. The negative electric fields on the right are blue or blueish in color.
There are some lines that start in the lower-center of both plots. These lines continue to the top of the image. These lines are the paths of ions of different mass-to-charge (m/z) values. Each line is a different ion that flew from the bottom-center. The ions stop flying if they reach a boundary of the simulation, such as an edge or one of the electrodes.
The icons for the popout window allow for some interactions with the plots. You can zoom in on the plots by clicking on the magnifying glass icon and then dragging a box you might like to zoom into somewhere on the plot. You can also edit some of the image parameters by clicking on the icon that shows an upwards-trending line. For instance, you can change the color of the lines that are plotted or even change the colormap for the electric fields:
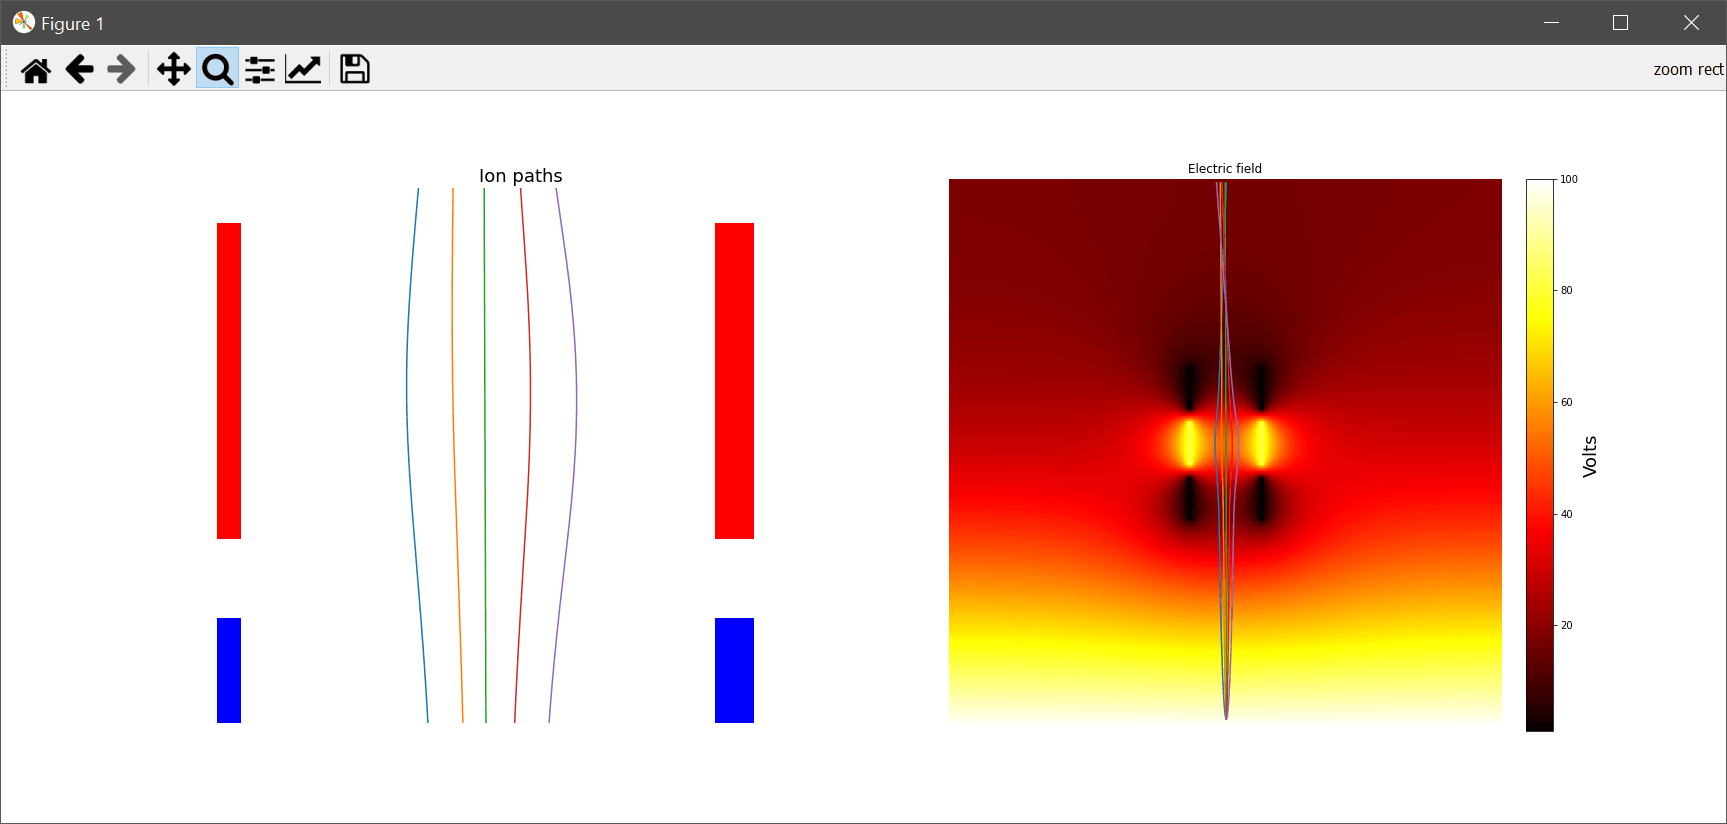
Here, I have zoomed in on the central electrode in the left plot and changed the colormap of the electric field map.
Editing the Electrodes
Playing with MS paint
Now that we’ve run our first simulation, we can edit the electrodes to see how it affects the simulation! First, we could try adding a green electrode at the top of the screen to see what might happen. The electrodes are just colors in the “electrodes.png” file. Open this image up in your favorite image editor (I will use Microsoft Paint) and add a horizontal green bar at the top (make sure it is pure green, just like the strip at the bottom of the “electrodes.png” file!):
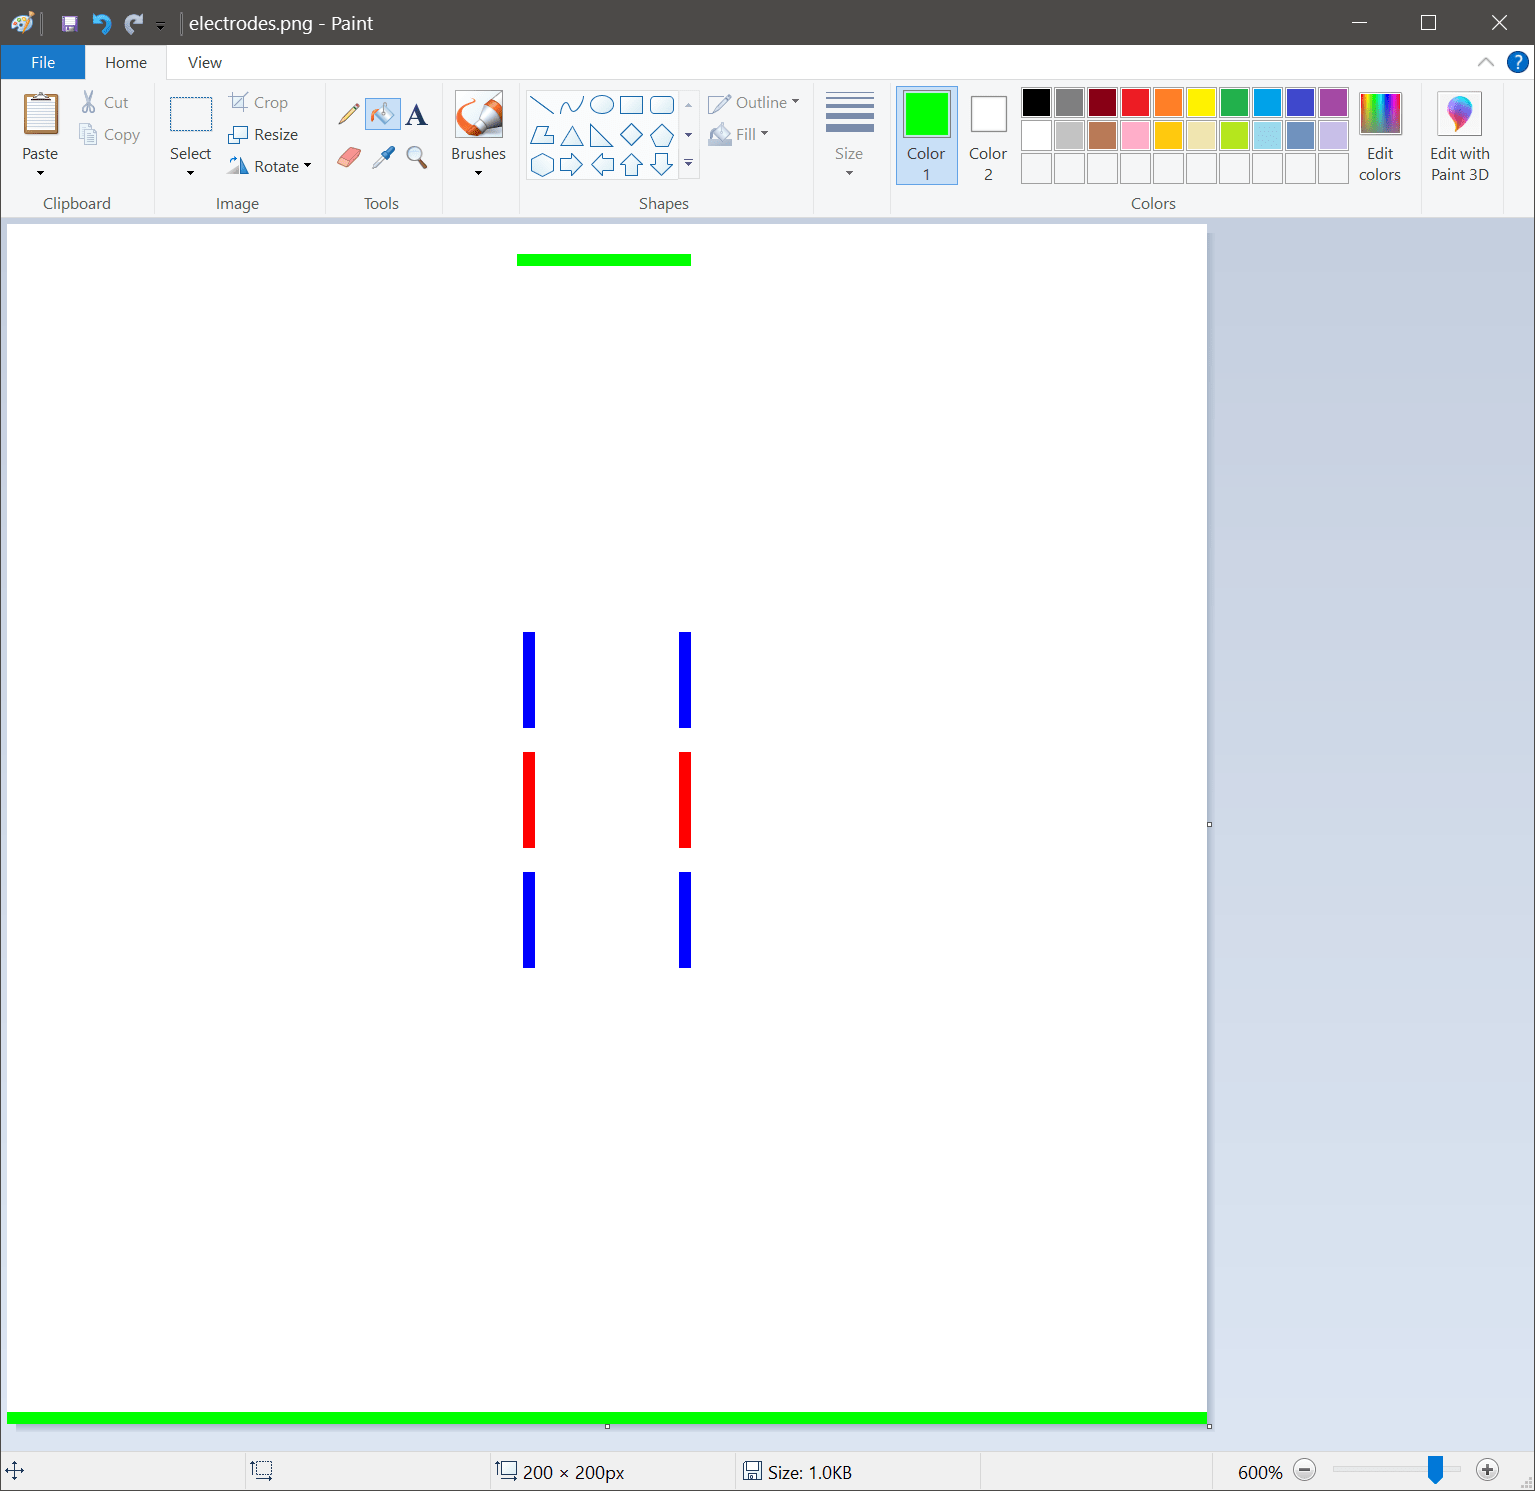
Now that the green electrode has been added, save the edited “electrodes.png” file (I generally use the shortcut “ctrl-s” or “cmd-s” as it makes editing faster). Make sure to save it in the same location and with the same name. Now running the ion simulation code we see:
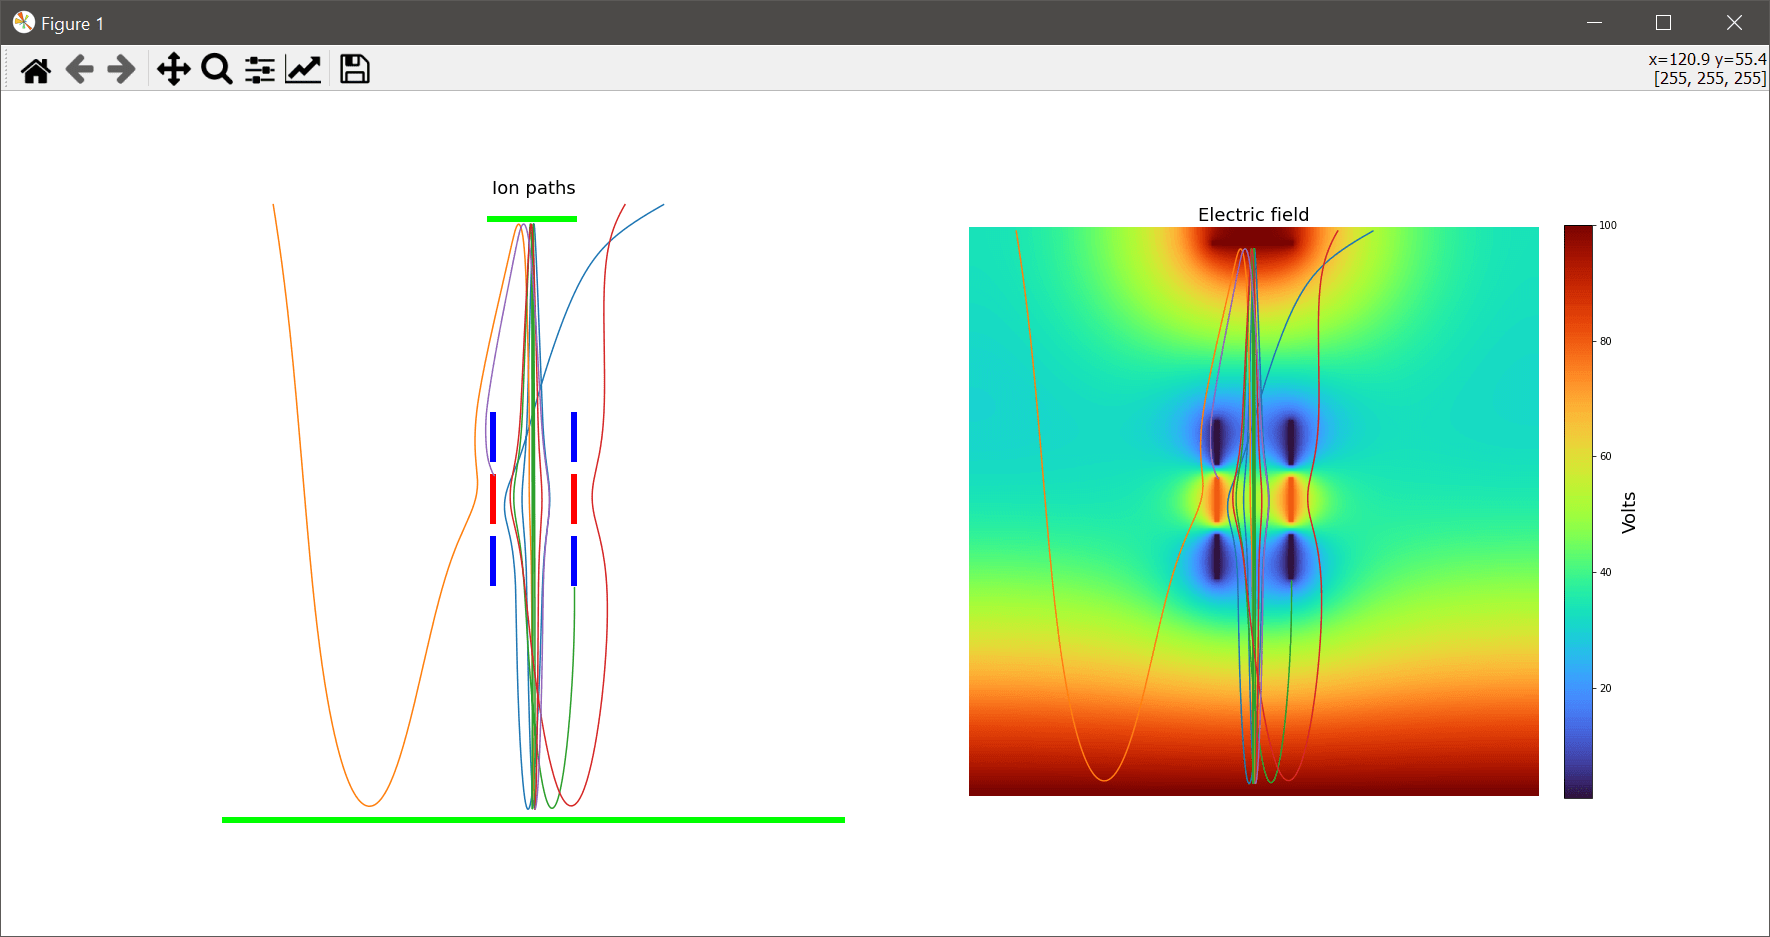
The green electrode repelled the ions away and they scattered in different directions!
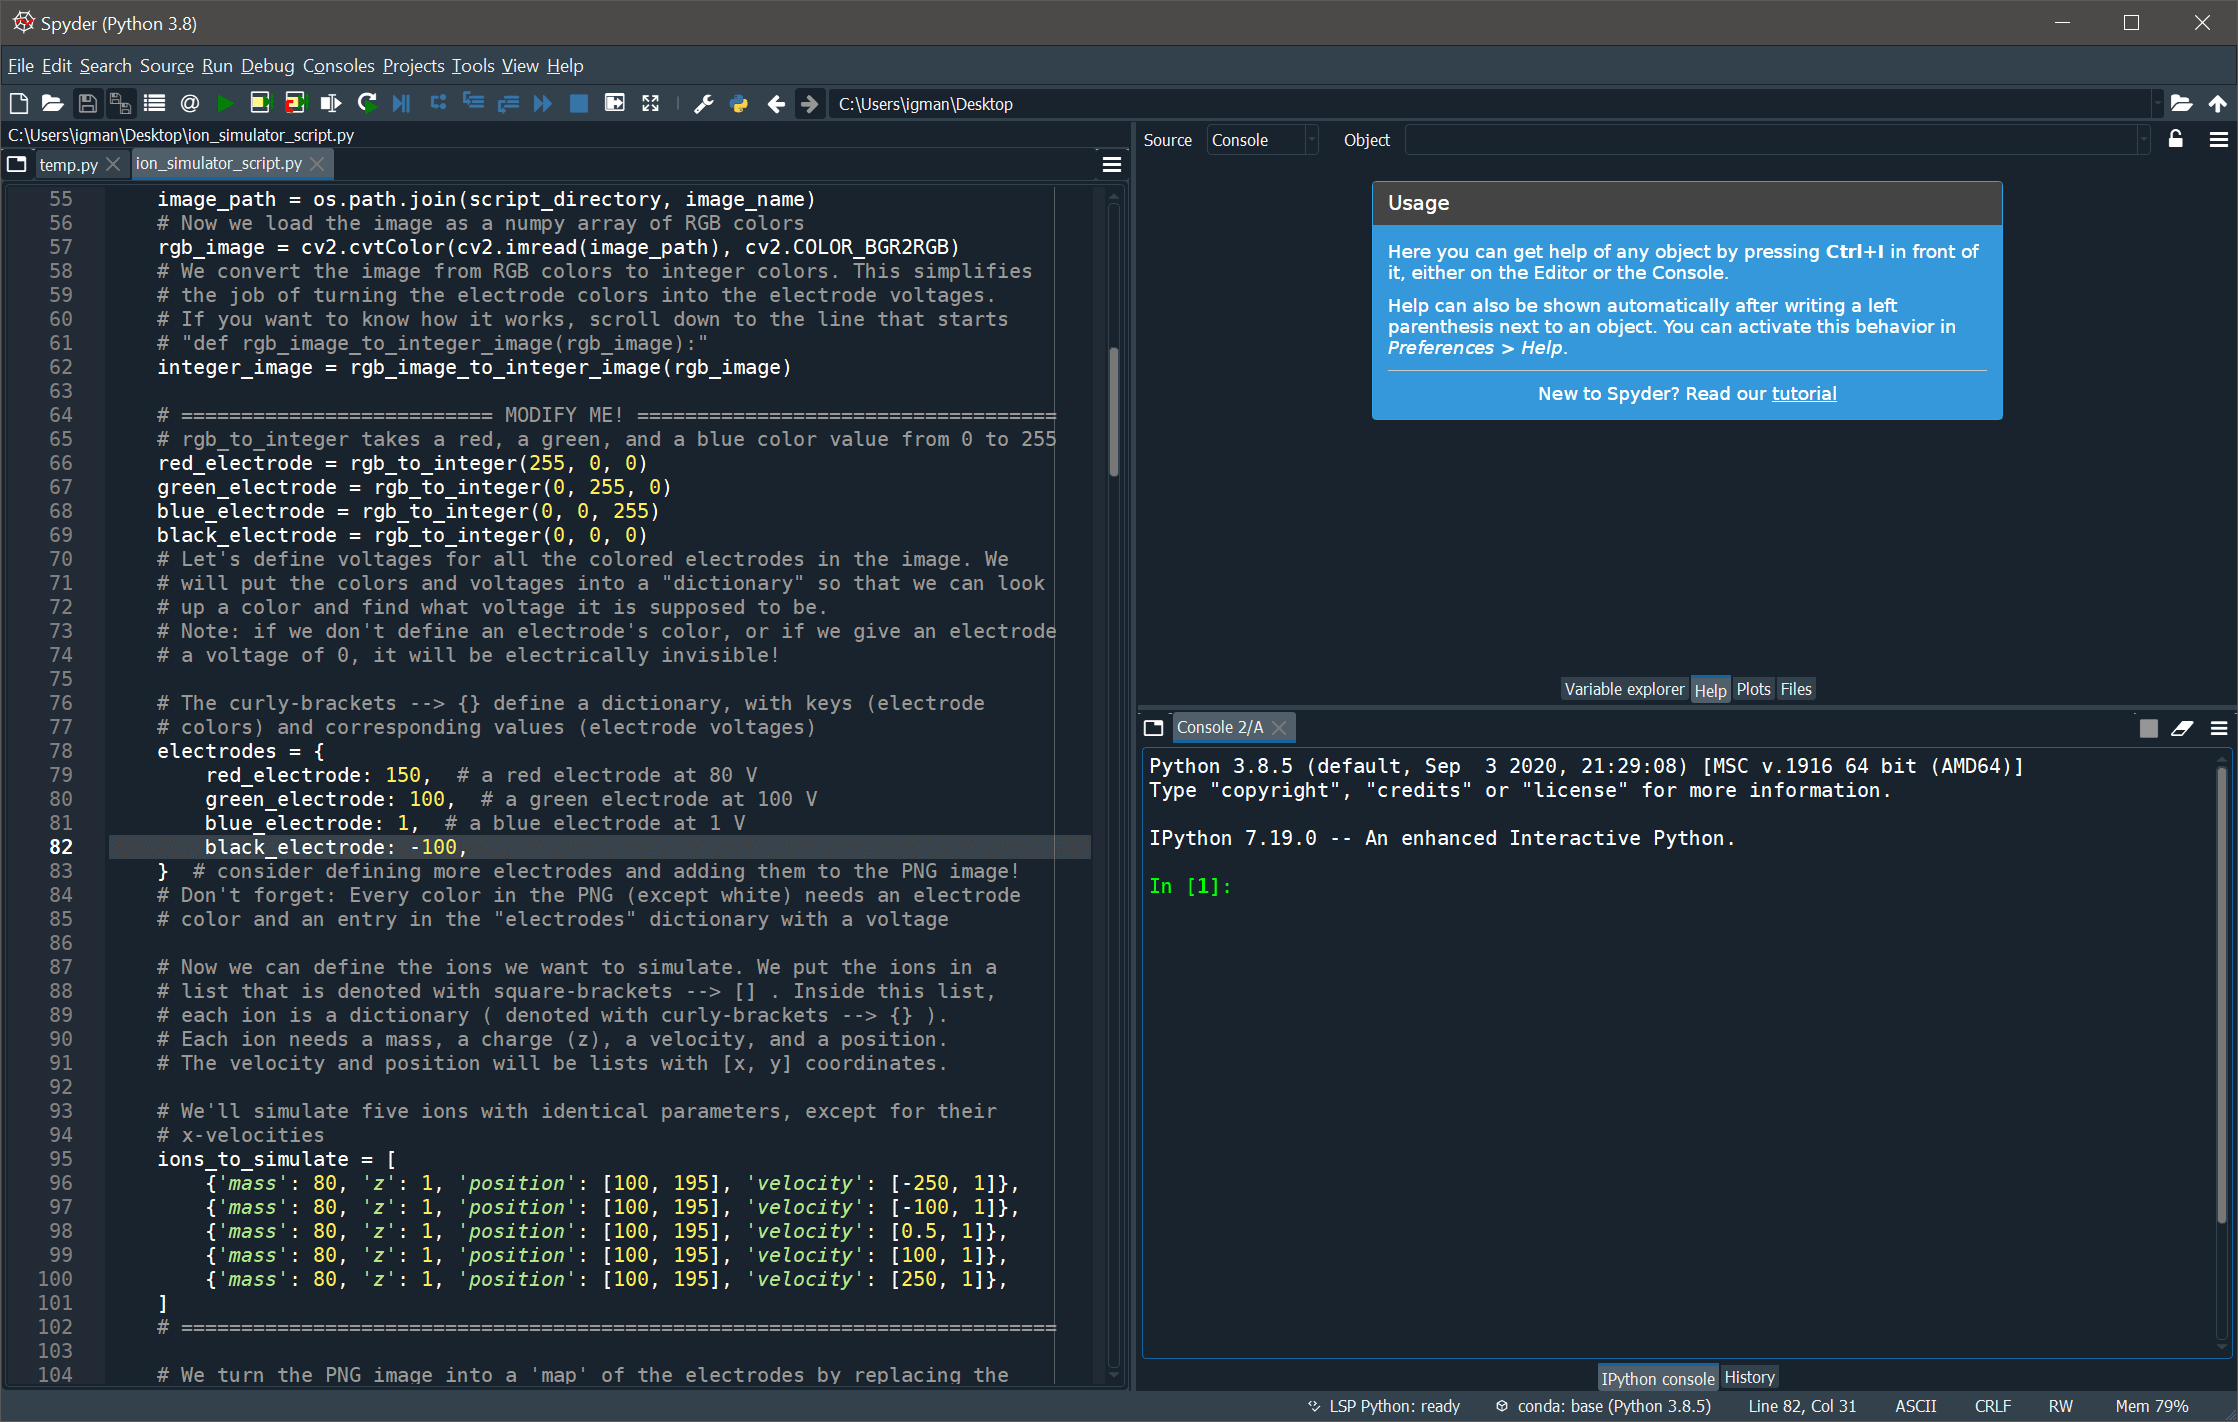
Since we are simulating positive ions, we could increase the voltage on the red electrode and try to repel them earlier. To do that, we can go to the “ion_simulation_script.py” source code on the “Modify Me!” section between lines 64 and 100.
The red electrode is defined to be RGB(255, 0, 0). The voltage value for is electrode is 80 volts. What happens if we change it to 150 volts? Let’s try it and find out!
Most of the ions didn’t make it through and were repelled!
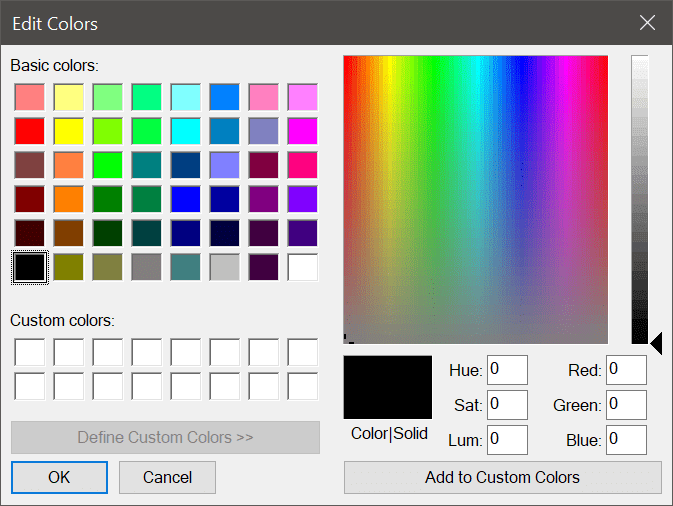
Now that we know how to edit electrodes and how to remove them, let’s try to add a completely new electrode! First we need to pick a color: I’ll pick black color by going to Microsoft Paint’s “Edit Colors” menu and choosing a value of RGB(0, 0, 0):
Then I’ll draw something in black. Here is my electrode:
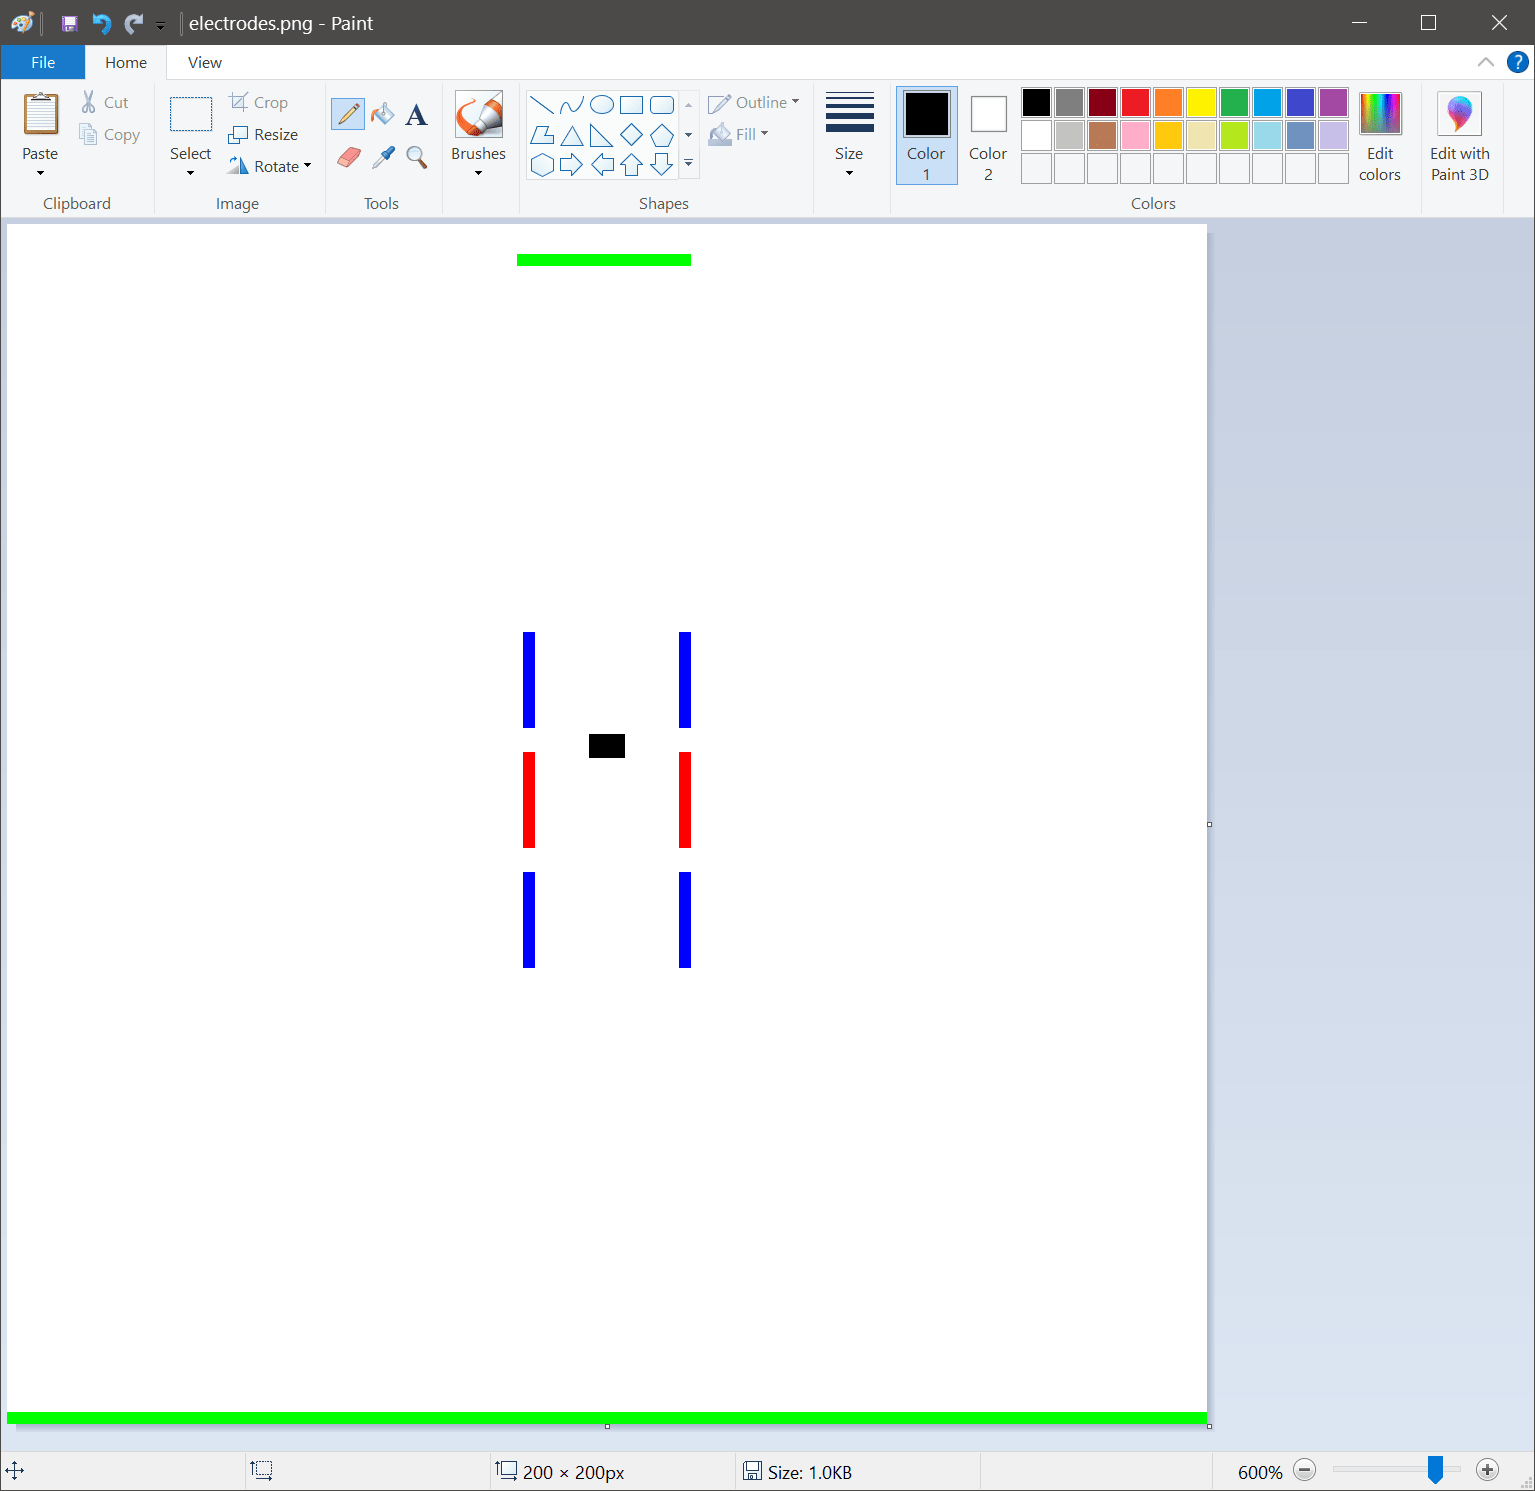
It’s in the center of the red electrodes. I’ll make it negative and try to attract the ions into it, so they won’t be deflected away anymore. I’ll try making it -300 volts! So I’ll go to the ion_simulator_script and define a black color, using my RGB values and add the “black_electrode” to the dictionary:
Now let’s fly the ions and see if they’re attracted:
It looks like it worked!
We can, of course, delete all these electrodes and try something completely different. Try it out!
Reading the Ion Simulation Script
Or: A crash-course in Python
Now that we know how to alter the script a little bit to change electrodes and how to change electrodes in Paint, we might want to dive a bit deeper into reading the script and figuring out how it works. The script should (hopefully) be self-explanatory, however, knowing some things up front might help.
Three single quotes at the top begin a documentation string or docstring. Docstrings are usually present at the start of files or the beginnings of functions to document what the file or function does. In this case, the docstring just provides a notice about the Ion Simulation Script’s authors and attributions. The docstring closes like it opens, with three single quotes (double quotes can also be used, but then the docstring must start and end with three double quotes). Docstrings are not code, but documentation. Python has another type of documentation, or “comments”. The next type is on line 5. This is a line comment and begins with a pound-sign or hashmark. This type of comment is generally about the code that follows it. Multiple lines of a single comment all need to start with a “#”. A “#” tells the Python interpreter (a program that reads the script file one line at a time, much like a person does, but then goes and runs the program, one line at a time) to ignore whatever comes after on that line.
Although learning Python is not needed for understanding the script, understanding a few key words and concepts might be helpful:
- Python has several key words that do special things:
- “Import” imports a library, allowing the script to access the libraries code.
- “as” creates an alias for something, often an imported library, so that you can refer to the alias, rather than the (usually longer) name of the library
- “def” begins a function definition
- “for” and “while” begin for and while loops, respectively
- “in” checks a collection for something
- “return” exits a function and causes the function to output whatever comes after “return” on the same line
- “if” does something if a condition is correct (e.g., if a number is 1, then add 10 to it)
- “else” does something if the “if” condition is incorrect (e.g., if a number is 1, then add 10 to it, else subtract 5 from it)
- “break” breaks out of a loop
- “continue” skips to the next cycle or iteration of a loop
- Numbers in Python can be integers (no decimal places) or floats (with decimal places). Math between these two types of numbers is easy and usually ends up with a float (1 + 1.5 = 2.5) because decimal points are conserved.
- Numbers can optionally have underscores to visually separate thousands-places
- Numbers can be expressed in scientific notation (1e5 is 10,000)
- Addition (+), subtraction (-), multiplication (*) and division (/) are intuitive and Python can even be used as a simple calculator.
- Strings are “strings” of letters like 'Hello' they can start and end with either double or single quotes (but the start and ending quotes must match).
- Lists are a collection type that can hold multiple strings or numbers (or both) (or even other lists). Lists are denoted with square brackets:
- [5, 'Hello', 3.5]
- Dictionaries hold collections of pairs of things and can be used to “look up” a “value” by its “key”. Keys are usually strings, values can be strings, numbers, lists, or even dictionaries! Dictionaries are denoted with curly braces:
- { 'Hello': 2, 'Goodbye':10 }
- Variables (collections of letters) are declared with a single equals sign and usually represent an number, a string, or a collection of numbers and strings:
- A = 5
- B = “Hello”
- C = [5, “Hello”, 3.5]
- electrodes = { '100,100,150': 5_000, '0,0,0': -1_500 }
- Variables can be used instead of the actual numbers or strings:
- A = 5
- B = 10
- C = A + B #(C would be 15)
- Functions are subroutines that usually take inputs and give outputs (through the return keyword). The inputs are given in parentheses () and then a colon starts the function. The “body” of a function is indented one level:
- def make_cake(eggs, butter, flour, milk, sugar):
- … (do stuff)
- return cake
- Functions are called in a similar way to how they are defined. A variable often is assigned to the result of the function:
- Eggs = 10
- Butter = 'cold'
- good_cake = make_cake(eggs, butter, flour, milk, sugar)
- Some functions are built in (like the print function or the round function) most functions are defined in the script itself. Some functions come from the libraries. Functions that come from libraries always start with the library name and a period. So “np.max” is the maximum function from the numpy library (that has been imported “as” “np”)
- A double-equals sign (==) checks to see if something is equal to something else:
- If x == 2:
- dish = make_cake(eggs, butter, flour, milk, sugar)
- else:
- dish = make_pie(eggs, butter flour, milk, sugar, fruit)
- Greater-than (>) and lesser-than (<)are similar to the double-equals sign (but for greater-than and lesser-than)
- The “print” function is built-in and prints out messages to the console:
- print('Hello world!') #Would print out “Hello world!”
- A “for” loop loops through a collection:
- colors = ['red', 'green', 'blue', 'black']
- for color in colors:
- print(color)
- (this would print out “red”, then “green”, then “blue”, then “black”)
Although this list is not comprehensive of Python, (or even comprehensive for the Ion Simulator Script), understanding how the concepts work should make reading the code easier and improve understanding.
Additional Ideas and Conceptual Questions
Stuff that’s likely to be on the test
After reading the Ion Simulation Script source code, you should be ready to answer some questions or think about things such as:
- How could we extend this script to do 3D simulations? What would need to change? Would it be more difficult to generate the electric fields or to fly the ions in 3D? Could we still use MS Paint to make the electrodes?
- Although this script is simulating an einzel lense, could it be used to simulate other kinds of lenses or even full mass spectrometers? If so, which kinds? Would you need to do any source-code modification, or could you simulate another kind of mass spectrometer through only modifying electrodes?
- How would you go about turning the output x-coordinates, y-coordinates, and times into a mass spectrum? Does this simulation have a “resolving power” or is it infinite? How could we simulate the resolving power of a TOF mass spectrometer? What could we do to try to “improve” that TOF’s resolving power?
- We fly ions one at a time in the loop. What assumptions does this make? When might simulating multiple ions simultaneously give more accurate results than simulating single ion flights? What problems might single ion simulations cause when adapting our simulations to the real-world?